Sketchup Upload Component Not Entire Model to 3d Warehouse
SketchUp components enable you to reuse objects. For example, pretty much every building has at to the lowest degree one door and window. Instead of modeling these common objects, you tin insert a component that someone else has already made.
Like all geometry in SketchUp, a component is still fabricated of edges and faces. The edges and faces are simply part of a special component group. (You can also create components to reuse your own geometry, simply that's covered in Developing Components and Dynamic Components.)
Table of Contents
- Getting started with components
- Inserting components
- Replacing components
- Interacting with dynamic components
- Searching for components
- Adjusting a component's insertion point
- Editing components
- Organizing component collections
- Gathering intelligence nigh components
Getting started with components
Before you start inserting components, y'all demand to know that every component has a definition and an case:
- A component definition provides a blueprint for how all components of a specific type announced and behave in the cartoon surface area.
- When you insert a component into a model, you create a component instance, which is based on its definition.
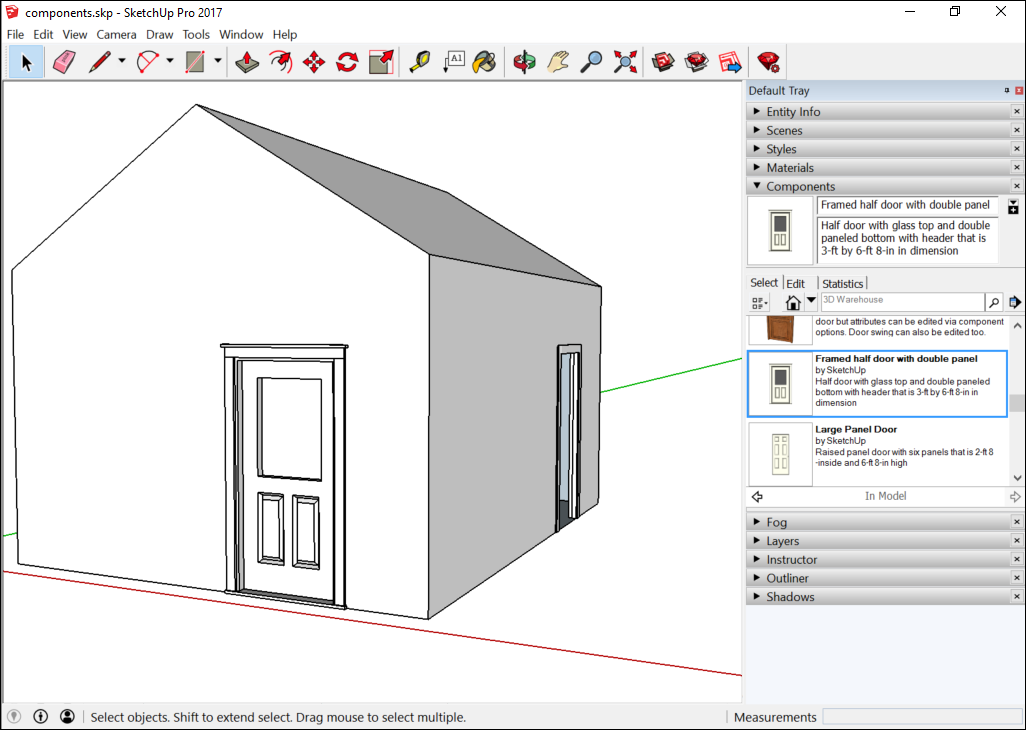
So, say yous desire to apply a premade component called Framed Half Door with Double Panel. The component definition outlines what that door looks like, and you tin can insert as many instances of that component into your model every bit you like. In the following model, you see two instances of Framed One-half Door with Double Panel. Inserting components, subsequently in this article, explains how insert one or more than component instances.
Tip: All this concern near the definition and instances is important, considering when you edit entities inside a component instance, you edit the definition, too. Alter the door's drinking glass, and the glass in all component instances changes. Change the double console into a single panel, and all the doors in your model accept a unmarried panel, too. Still, you tin can scale, rotate, and flip a whole component without changing the other instances. Editing components explains how to edit component entities or the component as a whole.
You lot tin can besides replace all component instances with another component. If you lot (or a customer) make up one's mind you don't like the Framed Half Door with Double Console, you can easily swap that component with a dissimilar i. Come across Replacing components, later in this article, for details.
Dynamic components have even more capabilities than regular components. If a component is dynamic, information technology has at least 1 of the following elements:
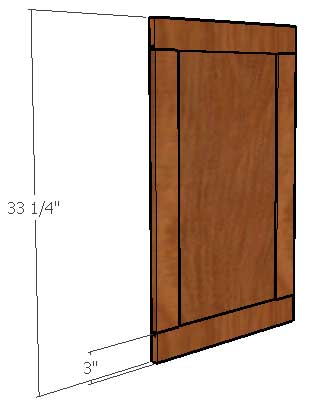
- Constrained values: For instance, a dynamic cabinet door component might have a frame that's constrained to 3 inches. Whether the panel within the frame is 12 x 24 inches or 24 x 48 inches or some other dimension, the frame remains 3 inches wide all the mode around the door, equally shown in the following figure.
- Repetitive elements: A dynamic component can have subcomponents that echo every bit you lot scale the component. For example, a repetitive dynamic component might add steps to a staircase, cushions to couch, pickets to a fence, studs to construction framing, and so on.
- Configurable values: A dynamic component can have a predefined ready of values that yous can configure, such as a couch'southward length or the picket spacing in a debate component.
- Animated features: An blithe dynamic component moves when y'all click it with the Interact tool (
 ). With animated dynamic components, your model tin have doors and windows that open. Interacting with components, later in this commodity, explains how to open up and close blithe components.
You can find a few sample components in SketchUp'due south Components panel, but components' true abode is the 3D Warehouse, an online tool for searching and downloading 3D models created in SketchUp. This commodity helps yous navigate the Components panel and first searching for components in the 3D Warehouse via tools available in SketchUp.
After you become comfortable inserting and editing components, you might develop a special fondness for components that you notice in the 3D Warehouse or create yourself. To keep your favorite components handy and organized, yous can create collections in the Components panel.
In the post-obit video, y'all encounter a brief introduction to components, how components are different from groups, and means you tin can edit components. Although this video was created on an older version of SketchUp, the basic component behavior and features are the aforementioned in current SketchUp versions. In the sections that follow, you find detailed steps that walk you lot through the basics of inserting and working with components and dynamic components.
Inserting components
You lot can insert a component instance into your model in iii ways:
- Select or download a component via the Components panel.
- Import a SketchUp file (with the
.skpfile extension). - Drag a SketchUp file from File Explorer (Microsoft Windows) or the Finder (Mac Bone 10) into your model.
Premade components are most often inserted from the Components panel into a model. Follow these steps:
- Select Window > Components. Click the correct-pointing arrow next to the Components panel in the Default Tray. By default, the Components console opens to the Components Sampler collection, as shown in the figure.

- You can select one of the sample components and proceed to the next step. However, the sampler'due south option is express compared to the vast selection in the 3D Warehouse. To endeavor the 3D Warehouse, type a search term in the 3D Warehouse search box. (Searching for components, later on in this commodity, explains other ways to search the 3D Warehouse.) To browse collections, click the down pointer next to the In Model icon (
 ) and select a collection. (Run into Organizing component collections for details well-nigh the existing collections and how to create your own.) After you select or download a component, SketchUp loads the component onto the Move cursor.
 - Click in the drawing surface area to place the component in your model.
Tip: If you lot have trouble seeing the components in the Components panel, try irresolute your view options. Click the View Options button ( ) and choose from Small Thumbnails, Large Thumbnails, Details, or List.
Note: After you download a component from the 3D Warehouse, the creator might update that component. To quickly update your local version of the component, context-click the component in your model, and select Reload from the context menu that appears. The components details page in the 3D Warehouse appears, where you tin download the new version and thus reload your In Model component with the latest 3D Warehouse version. If you want to go on the old component only besides add the new version to your model, context-click the component and select View Details. You see the component's details page, but instead of reloading the former component, the new version is added to your model equally a new component instance.
If you have a SketchUp model saved to your hard drive, you can import that model as a component in another model. Follow these steps:
- Open the model into which you want to import a SketchUp file.
- Select File > Import.
- In the Open up dialog box that appears, navigate to the SketchUp file. If you don't see your file, in the Files of Blazon drop-downwardly list, select SketchUp Files (.skp).
- Select the SketchUp file, and click Open. SketchUp loads the component onto the Motion cursor.
- Click in the drawing area to identify the component in your model.
Dragging a SketchUp file from the File Explorer (Microsoft Windows) or the Finder (Mac OS X) into an open model too loads the SketchUp file onto the Move cursor. Merely click to place the component in your model.
Tip: When your component is loaded onto the Move tool cursor, the Move tool is anchored to the component'due south axis origin point. If that doesn't work for you, change the location of the component'south axis origin before you insert the component. Doing so volition change the default insertion betoken. Encounter Adjusting a component'southward insertion signal for details.
Replacing components
People similar to encounter different options, and they modify their minds all the time. When indecision strikes or your pattern just hasn't become clear to you yet, know that y'all can easily supplant 1 component with another component. Hither's how the process works:
- Add together the new component to your model. If you don't have anywhere to put it, but place it in an empty area in your model by following the steps in the preceding section. Placing the component somewhere in your model ensures that the component appears in your In Model collection. (Even if y'all and then delete the component for now, the component remains in your In Model collection until you purge unused components.)
- In the Components console, click the In Model icon () to come across your In Model collection.
- Select the component or components that you want to supervene upon.
Tip: To select all instances of a component, context-click the component in the Components panel and choose Select Instances, as shown in the effigy.
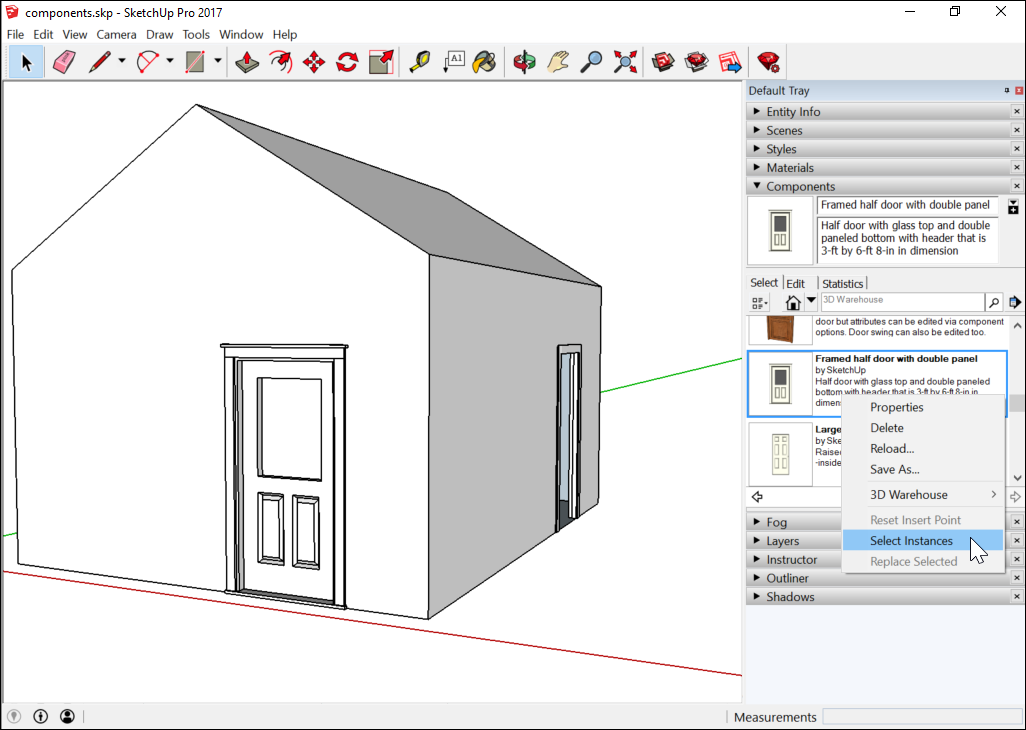
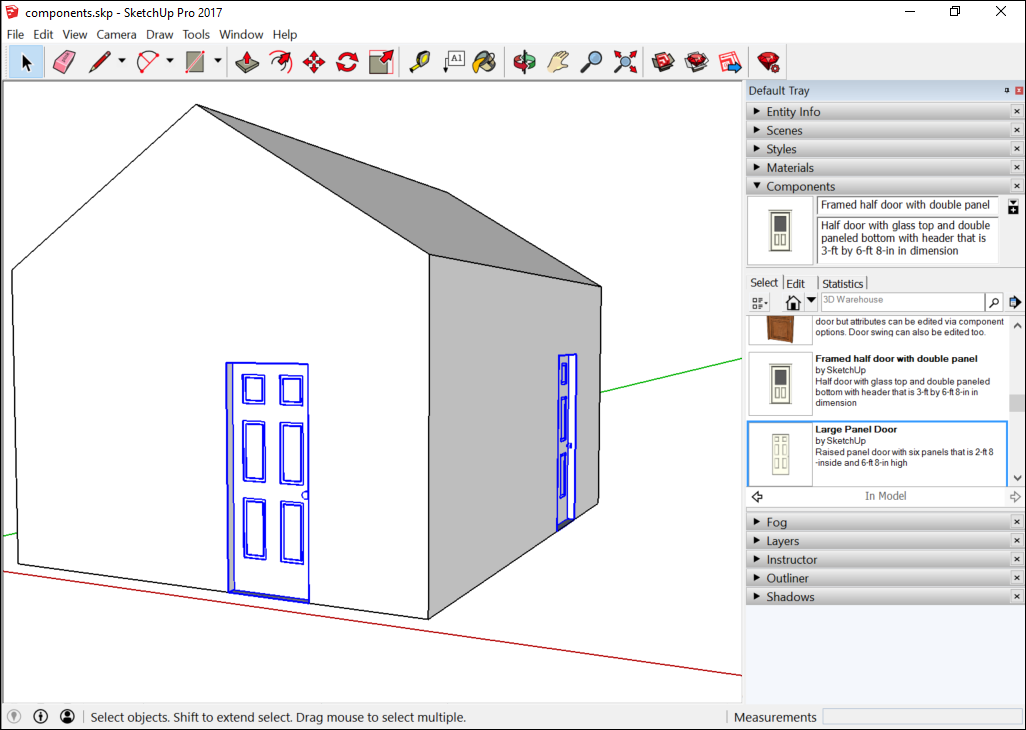
- In the Components panel, context-click the component you want to utilize instead of the existing 1 and choose Replace Selected from the context menu. In this instance, that'due south the Large Console Door component. The old door is now replaced with the new door, as shown in the following figure.
Tip: SketchUp Pro users take an additional tool: the Swap Component command, which works with dynamic components.
PRO To bandy out a series of dynamic components in SketchUp Pro, follow these steps:
- Select the dynamic components you desire to replace. The components are highlighted in the drawing window.
- Context-click one component, and select Dynamic Components > Swap Component. The Select a SKP dialog box is displayed.
- Select the SketchUp file containing the dynamic component that will replace the currently selected components.
- Click the Open push. The new dynamic component replaces the previously selected dynamic components.
Interacting with dynamic components
Your ability to interact with a dynamic component depends on its variables. In the following figure, you see a basic edifice with 2 instances of a dynamic door component.
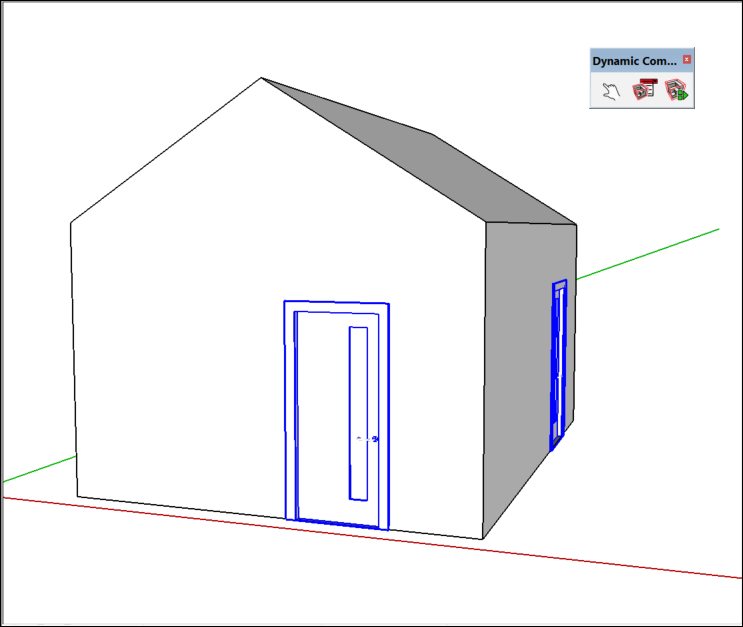
To activate the component's blitheness, select the Interact tool () on the Dynamic Components toolbar or select Tools > Interact. When yous click the door with the Collaborate tool cursor, the door opens, as shown in the post-obit effigy.

This dynamic component also has configurable values. To see these values, click the Component Options tool ( ) on the Dynamic Components toolbar or select Window > Component Options. In the Component Options window, shown in the post-obit figure, y'all tin can choose from preset options for the frame width, frame height, door type, and more.

Searching for components
You lot can search for components in the Components console or the 3D Warehouse.
In the Components console, on the Select tab, you can use the following features to browse or search for components:
- In Model icon: Click the In Model icon (), and you see the In Model collection, which shows all the components currently saved with your model. Notation that a component doesn't have to actually appear in your model to be saved with it.
- In Model drown-down bill of fare: Click the downwardly pointer next to the In Model icon, and from the list that appears, yous tin can select premade collections such equally Architecture, Mural, People, and Transportation. This menu may also show collections y'all've created, collections yous've designated equally a favorite, or collections you've visited recently. (Organizing component collections, subsequently in this commodity, explains how to create and manage collections.)
Tip: If your model is geolocated, the Components console enables you to search for nearby models. Search for components in the search box. And then, from the In Model driblet-downwards menu, select Nearby Models, which filters your search results to nearby models.
- 3D Warehouse search box: Type a search term in the box and printing Enter (Microsoft Windows) or Return (Mac OS X), and y'all see a list of components from the 3D Warehouse. To connect to the 3D Warehouse, your estimator needs to an Internet connexion. If your search brings upward multiple results, you can click the arrows at the bottom of the Components panel to come across more than results. You may find it easier to search the 3D Warehouse in a total browser window than the Components panel, which is too modest to evidence much detail in the component thumbnails.
To access the 3D Warehouse directly from SketchUp, click the Get Models tool ( ), which you lot observe in the following parts of SketchUp'south interface:
- Getting Started toolbar
- Warehouse toolbar
Yous can as well select File > 3D Warehouse > Become Models.
Whichever method you apply, the 3D Warehouse opens, as shown in the post-obit figure. From the opening screen, you can scan the featured models, featured manufacturer catalogs, featured collections, and recent models. Notwithstanding, you most likely want to use the Search box at the summit. Type a search term and click the Search button.
Tip: Start with the well-nigh specific search term. For example, if you're looking for a window that's a dynamic component with a cut plane that makes a hole in your model, type a search term like, dynamic component window cuts face up. If you lot don't detect a component you like, make your search term less specific from there.
When you lot find a effect that interests you, click it to open up its details page. Click the Download button in the upper right to download the component into your model. You and so return to SketchUp, where the Move cursor is loaded with the component. Click in the drawing surface area to identify the component in your model.
Adjusting a component'southward insertion point
A component has its own axis origin betoken, which determines the component'southward insertion point, or the point that'due south loaded onto the Move cursor when y'all place a component in your model.
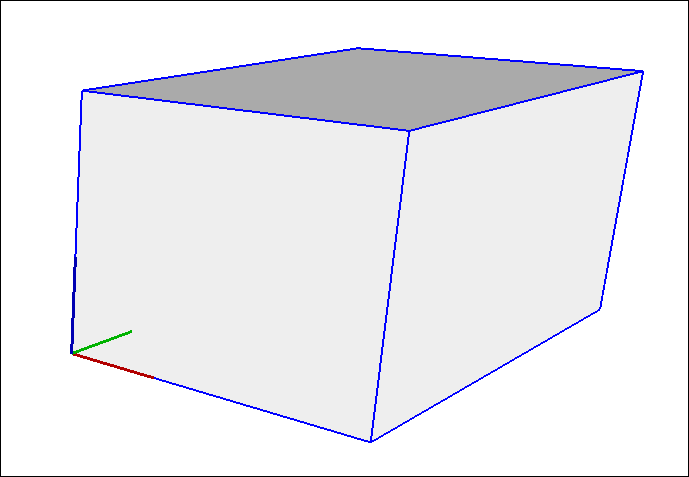
If the component is box-shaped (such as a dresser, cabinet, or the Mesopotamian Tablet of Destinies), the insertion point is typically the front, lower-left corner, as shown in the figure. That placement works great — unless you need to place the component confronting other components or otherwise piece of work around existing geometry.
Whatever your reasons for moving the insertion signal, hither'southward how to reset a component's axis origin:
- Select the component in your model.
- Context-click the component and select Modify Axes.
- With the Axes tool cursor that appears, reset the axis origin. Run across Adjusting the Drawing Axes for details well-nigh working with the Axes tool. The only difference is that you're setting the centrality origin for a component, not the whole model.
Tip: Later on you place a component in your model, yous tin move the component past any point you like. Simply select the Move tool ( ), click the betoken you want to apply for moving the component, and click once more to place the component. For example, after placing a cabinet component in your model, y'all might need to movement the cabinet by its midpoint so you can slide the cabinet next to existing cabinets. See Moving Entities Around for more about moving entities with the Move tool.
Editing components
You can edit a component equally a whole or edit individual entities within a component.
Editing or modifying a component instance equally a whole affects merely the component instance, non the component definition or other instances. Here are some of the edits you can make to a component as a whole:
- Scale: Scaling a component as a whole scales the individual component instance, not the component definition, assuasive you to have differently scaled instances of the same component in your model. A component can get skewed when you calibration the component in multiple directions. You tin reset a component'south scale and skew by context-clicking the component and selecting Reset Calibration or Reset Skew. To calibration a component, use the Scale tool(
 ), every bit explained in the commodity, Scaling Your Model or Parts of Your Model.
 - Flip: You can flip (or mirror) a component along an axis. Context-click the component, select Flip Forth, and select an axis (Component's Red, Component's Green, or Component's Blue).
- Rotate: You lot can rotate a component with the Rotate tool (
 ) or the Move tool (). When you lot use the Rotate tool, you accept more control over the rotate plane and center of rotation.
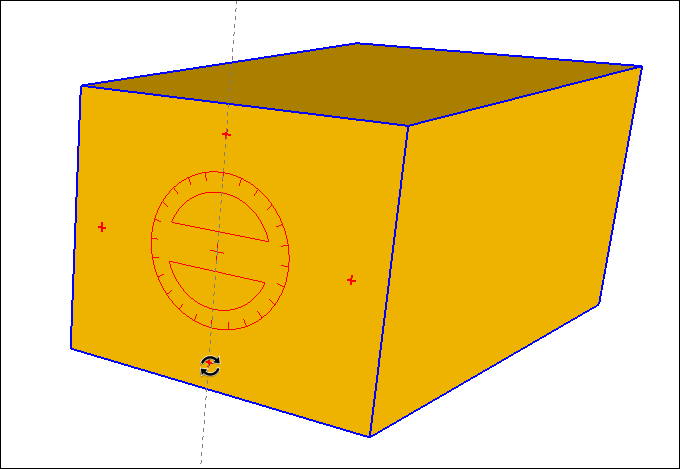
Flipping and Rotating explains how to flip and rotate geometry. To rotate a component with the Move tool, hover the Move tool over a face that'south perpendicular to the desired axis of rotation until four rotation handles and a protractor announced on the face, as shown in the following figure. And so click a rotation handle and rotate the component.
Editing entities within a component changes the component definition, and thus changes all other component instances in your model. To acquire about the more than advanced techniques involved in editing a component definition, see Editing a Component in the Developing Components and Dynamic Components department.
You tin also save edits to your component, revert an edited component to the original file, or explode the component:
- To save an edited component as a separate file with a new proper name, select the component, context-click it, and select Save Every bit from the menu that appears. Navigate to where yous want to save the
.skpfile, type a new name, and click Save. - To reload a component from its original file, which overrides any edits, context-click the component and select Reload.
- To break a component back into its entities, select your component and then select Edit > Component Instance > Explode from the menu bar. Or context-click the component and select Explode from the menu that appears. Your component is no longer a component with a special force field. Information technology returns to obviously old geometry, kind of like a captain returning to civilian life.
Note: You tin can edit properties of a component, such as whether it cuts a hole in a face, or set variables for a dynamic component. Because these advanced tasks are closely related to creating components, you observe out how to work with these properties in Developing Your Ain Components or Dynamic Components.
Organizing component collections
In SketchUp'south Components panel, collections assist y'all organize components.
The In Model collection is a special collection that's an of import part of the Components panel. It holds all the components saved with your model, whether or non those components currently appear in your model. When you context-click a component in this collection, y'all see commands not available in other collections, such as Select Instances, Reload, and more. To come across your In Model drove, click the In Model icon (). If you've inserted several components that you no longer need to save with your model, click the Details arrow (![]() ) and select Purge Unused.
) and select Purge Unused.
SketchUp includes a few prebuilt collections, such as Architecture, Landscape, Structure, and and then on. You discover these collections by clicking the downward arrow side by side to the In Model icon, as shown in the post-obit figure.

Tip: By creating your own collections, you lot can organize components in whatever way makes sense to you. If you use certain components all the time, create a My Favorite Components collection. If y'all utilize specific components for a certain client or project, organize them into a drove so they're attainable from a single collection.
The following steps explain how to create a component collection for your selected operating system (Microsoft Windows or Mac OS X):
- Select Window > Components Open the Components dialog box in the Default Tray to open the Components panel.
- Click the Details arrow (
 ) and select Create a New Collection.
 - In the Salvage dialog box that appears, navigate to the folder where you lot want to save your collection. To create a subfolder for the drove, click the New Folder button and create the folder.
- Select the folder where you want to relieve the components collection and click Save. Y'all see a bare drove on the Components panel's Select tab.
- For each component yous want to add to your drove, save it as an
.skpfile in the folder that y'all selected in the preceding stride. (If the component is in your model, context-click it and select Salvage As.) The following figure shows the Galaxy Course Starship component saved in a collection called Favorite Components.

Tip: Later on y'all have a few collections, you tin add together them to a list of favorite collections that always appears on the In Model drop-downwards card. Get-go, display the collection the Components panel: If you used the collection recently, you tin select the collection by name from the In Model drop-down menu. If the collection doesn't announced there, click the Details arrow and select the Open or Create Local Collection (Microsoft Windows) or Open a Local Collection (Mac OS X). Later your drove appears in the Components panel, click the Details pointer and select Add to Favorites or Remove from Favorites.
Gathering intelligence about components
SketchUp provides a few tools that enable you to detect important details about components:
- The Entity Info window is the nigh bones. To open information technology, context-click a component and select Entity Info. Or select a component and and so select Window > Entity Info open up the Entity Info dialog box in the Default Tray . If your entity is indeed a component, y'all come across Component in the upper left and how many of instances of the selected component appear in your model.
- In the Components panel, you see the component'southward name, thumbnail, and description at the tiptop. Click the Statistics tab, and you see a report of how many elements, such equally faces, edges, structure lines, appear within the component. Select All Geometry from the driblet-down list to see statistics for all geometry in the component or group. Alternatively, select Components from the drop-down list to see statistics for all components in the component. Finally, click Expand to see components and groups nested within the currently selected component or group.
davidsonforeplarks.blogspot.com
Source: https://help.sketchup.com/en/sketchup/adding-premade-components-and-dynamic-components
0 Response to "Sketchup Upload Component Not Entire Model to 3d Warehouse"
Post a Comment